This example begins with the Actor 5 example from Chapter 13 (Polymorphism). We have two main tasks (one of which is broken into three smaller sub-tasks) to complete in this example:
Convert CList into a "templatized" class
Merge CList.h and CList.cpp into a single file
Add the template syntax
Change the stored data type into a template variable
Convert the client to use the new template class
Converting CList To A Template Class
The compiler can't process templates until concrete values replace the template variables. Generally, programmers specify a "real" data type to replace the template variables. For this reason, all template code is placed in a header file that is then included in and compiled with the client code. Begin by opening both CList files (CList.h and CList.cpp).
Select all of the code in CList.cpp and copy it to the clipboard. Next, go to CList.h and place the cursor after the class. If the code ends with an #endif directive, the cursor must be before the directive (that is, between the class and the directive). Copy all of the code from CList.cpp into CList.h at the cursor location. Complete the merge step by editing the #include directives:
Remove #include "Person.h" from the original CList.h code
Remove #include "CList.h" from the code that was copied from CList.cpp
Move the two remaining include directives and the "using" statement (three lines total) above the class specification
Once the merge operation is complete, we are ready to add the template syntax. We must add the template syntax at many different locations, but it is the same syntax, so we copy and paste it throughout the program.
Add the line template <class T> above the CList class and above every function in the code copied into the CList header file
Add the symbols <T> between the class name and the :: in each function header
"Templatized" CList class. Following the merge step (1.a) and the template syntax step (1.b), the code in CList.h should look the code illustrated here, there this one remaining step.
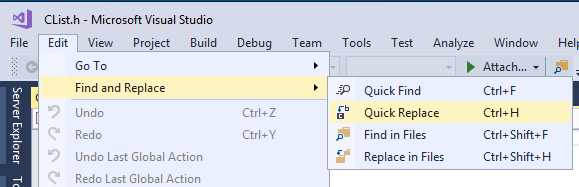
There is still one important sub-step remaining in the "templatizing" process. As it stands, CList still specifies "Person" as the stored data type. This must be generalized by replacing Person throughout the program with the template variable T. Most editing programs, word processors, and program text editors alike support an operation called either "Search and Replace" or "Find and Replace." In visual studio, the operation is located in the Edit menu:
(a)
(b)
Beginning with the Edit menu, select Find and Replace and then Quick Replace
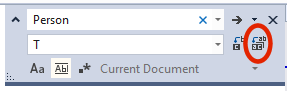
Enter "Person" as the find string in the top text field and T as the replace string in the bottom text field. Press the "Replace All" button (circled). All instances of "Person" are replaced with "T"
Generalizing the name of the stored data type (step 1.c) is the last step needed to "templatize" the CList class. Save the modified CList.h file and copy Actor5.cpp to Actor6.cpp.
Modifying The Client
Modifying the client (Actor5.cpp) to use the "templatized" class requires one simple modification: specifying the actual data type to store in the list. That means specifying the class name that will replace T in the template code.
CList people;
CList<Person> people;
(a)
(b)
Using a template class. All variable definitions consist of two main parts: (1) a data type and (2) a variable name. Using a template class requires us to modify the first part, that is, the data type.
The original variable definition prior to being modified as a template
Defining a variable whose type is a "templatized" container
int main()
{
	CList<Person>	people;			// make a CList to hold instances of Person

	Star* s = new Star("John Wayne", "Cranston Snort", 50000000,
			"123 Palm Springs", "Ogden");
	s->setDate(1960, 12, 25);
	people.insert(s);			// insert Star, upcast to Person

	Actor* a = new Actor("Dilbert", "Wally", "2401 Edvalson", "Ogden");
	a->setDate(1961, 1, 1);
	people.insert(a);			// insert Actor, upcast to Person

	Person* p = new Person("Alice", "115 Elm", "Ogden");
	p->setDate(1975, 5, 22);
	people.insert(p);			// insert Person

	people.list();				// list (print) all instances of Person in people

	return 0;
}
CList example. This example illustrates how to define a CList container that stores instances of class person (or any of its subclasses), how to insert the instances into the list, and how to list or display all of the instances in the list. The "insert" and "list" operations are implemented as member functions of the CList class. The CList class requires that the stored data type, "Person" in this example, define a getter function: string getName().
The name of the template class and the name of the stored data type are ultimately joined together to form a new, user-created data type (known as an abstract data type or ADT). So, the compiler creates and includes a new class for each data type stored in the template class. For example, assume that we have a template named "Foo" that can hold or store fundamental data types (like int and double) and instances of classes (like Person):
The four variable definitions create three distinct versions of the Foo template class: one that holds ints, one that holds doubles, and one that holds instances of Person. In the first two definitions int replaces the T in the template; in the third definition double replaces the T; and in the last definition Person replaces T. So, only one version of the Foo code, with T replaced by int, is needed because both list1 and list2 are instantiated from the Foo<int> template.
An Easy Mistake
Think of a container as a kind of software basket. It's common for programs to perform some iterative (looping) operation that creates new objects and puts them in the container. But the program only needs one container to hold many objects. Programmers must create the container where the program won't discard and replace it during each iteration.
Defining a container variable (people) inside the loop causes a new container object to be created during each iteration of the loop. Each time that the program instantiates or creates a new container, the old container is discarded. Any data stored in the previous container is discarded with the container itself.
Only one container is needed. The way to correct the problem of example (a) is to move the definition of the container object outside of the loop. During each iteration of the loop, new data (new instances of Person) may be added to the container without loosing or destroying previously entered data.