
Welcome WSU Art and Science Summer Camp 2018 Students
We will be working with the Raspberry Pi computer to learn some of the fun things you can do with computers. Our main project will be setting the Raspberry Pi up as a free digital book library that others can connect to and download a book from. The idea comes from an Adafruit tutorial but has been modified and updated. As part of this process we will be:- Installing the NOOBS and Raspbian operating systems
- Setting localization information
- Configuring remote access (SSH and VNC)
- Test the remote connections (SSH and VNC)
- Setting up a wireless access point
- Installing the Apache Web Server
- Creating the digital library
- Other Resources
- ls
- List the contents of the current directory(folder)
- ls someFolder
- List the contents of the specified directory(folder)
- cd
- Change to the home directory(folder)
- cd someFolder
- Change to the someFolder directory(folder)
- cp sourceFile destFile
- Copy the file sourceFile to the file destFile. (Overwrites destFile without warning if it exists).
- mv sourceFile destFile
- Moves the file sourceFile to the file destFile. (Overwrites destFile without warning if it exists).
- rm sourceFile
- Permanently deletes the file sourceFile. (It does not go to a recycle bin or trash can).
Installing NOOBS and Raspbian
Plug in the micro sdcard to the usb micro sdcard reader.
Plug the usb micro sdcard reader into the computer.
Extract the contents of the NOOBS zip file onto the micro sdcard.
Listen to boring speel about the Raspberry Pi. ☺
When the files have been placed onto the sdcard, ejected the sdcard from the computer.
Unplug the keyboard, mouse and ethernet cable from the back of the computer and plug them into the pi.
Plug in the HDMI cable to the Pi and finally connect the pi to the USB power supply.
Choose the Raspbian operating system and install.
Listen to boring speel about computer networks. ☺
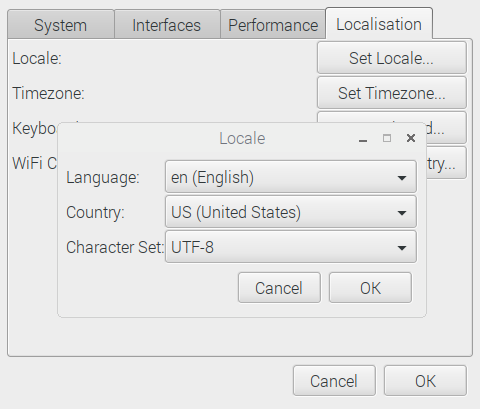
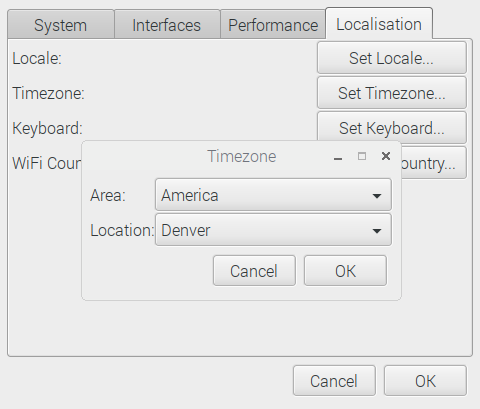
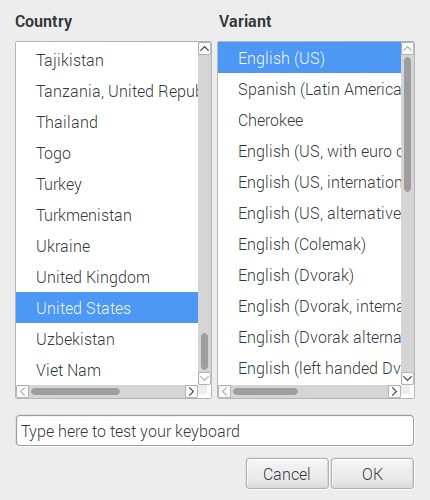
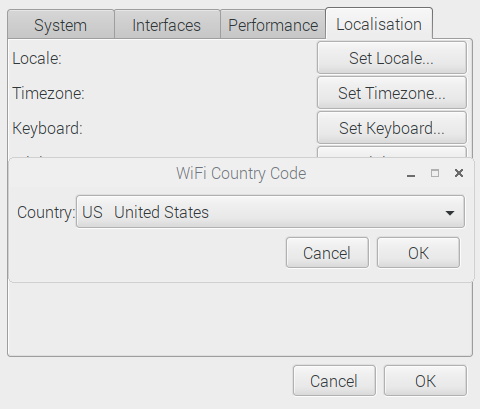
Setting localization information
Use the screenshots to set the following options:
Start the raspberry pi configruation program
Set the Locale (language, currency, date format, etc)
Set the Timezone
Set the keyboard
Set the Wifi country
Do not close the settings program or restart the pi if prompted. We have more settings to change.
Help your neighbor and explore the menus
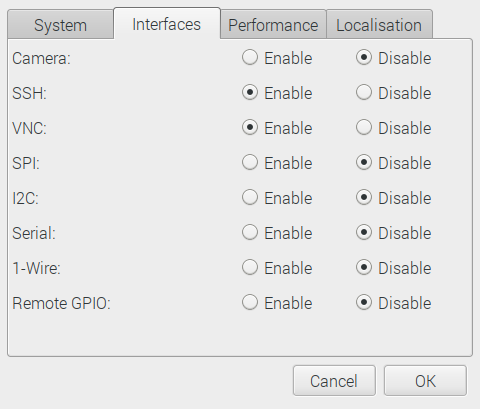
Configuring remote access
Use the screenshots to set the following options:
Start the raspberry pi configruation program if you closed it
Enable the SSH and VNC options. SSH lets you connect remotely to a terminal (command line) environment. VNC lets you connect to a graphical environment
Set the hostname. This is the name that will identify your raspberry pi device on the network. For this camp use your first and last name. Example: john_smith-pi. Do not use spaces, captial letters, punctuation marks, or other symbols.
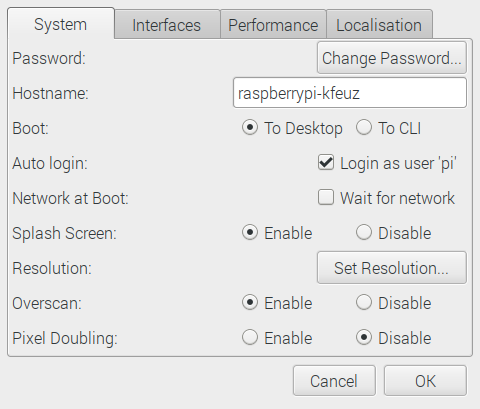
Set the resolution. Normally they default is fine. However, we want to be able to use the Raspberry Pi in headless mode (i.e. without a monitor). For this to work with VNC we must specify a manual resolution. See this VNC help page for more details.
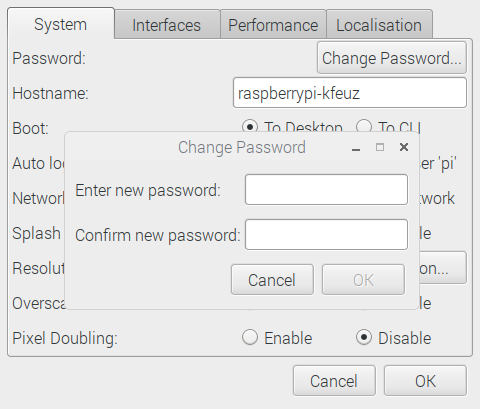
Set the password. The default password is the same for every installation. You should use your own unique password to keep the pi secure. Choose something that you will remember because there is no easy way to reset this password if you forget it.
Click Ok and choose yes to reboot the pi
Help your neighbor and explore the menus
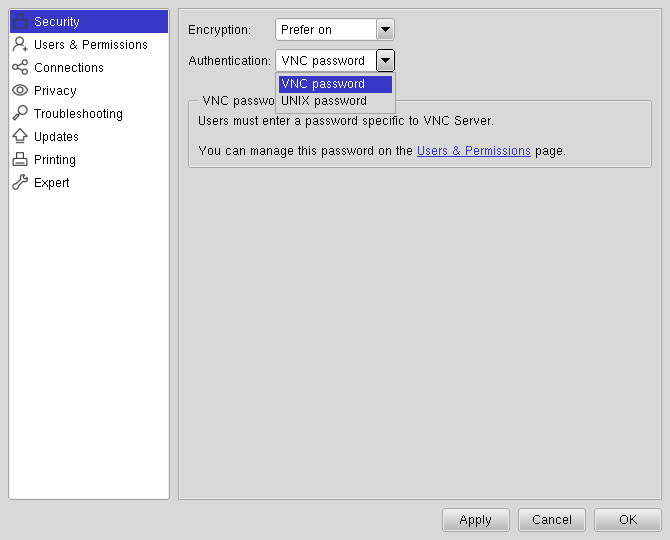
OPTIONAL
Only complete the next steps if you want to use a non-RealVNC viewer program such as ultravnc, tightvnc, tigervnc, etc.
Click the new VNC icon on the right hand side.
Click the VNC menu and select options.

Change the authentication method to VNC Password. (The default unix password only works with RealVNC Viewer)
Switch to Users & Permissions. Choose change password and enter a new password. (You can use your same user password if you want).
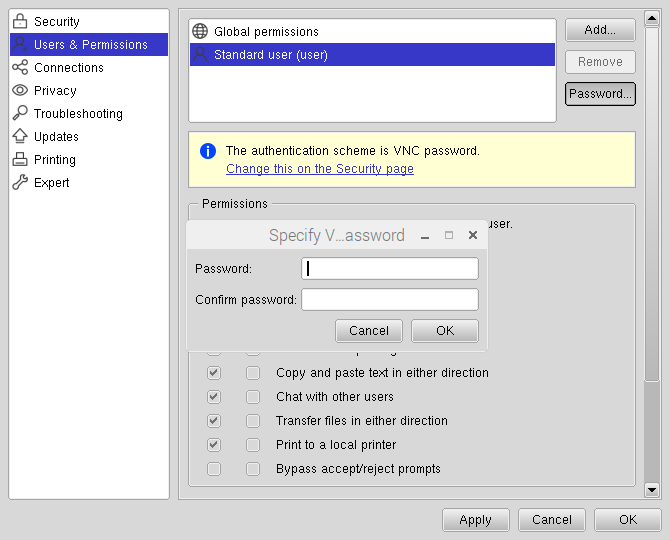
Select OK
Test the remote connections
Shutdown the Raspberry Pi.
Disconnect all of the cables from the pi.
Plug the keyboard, mouse, and ethernet cables back into the desktop lab computer.
Take you pi to a free ethernet cable (i.e. one where a fellow student or pi is not present) and plug in the ethernet cable to the pi.
Plug in the usb power supply to the pi
PuTTY
Go back to your lab computer and start PuTTY
Enter your username(pi) and hostname separated by an @ symbol. Make sure the protocol is SSH and the Port is 22 (should be the default values)
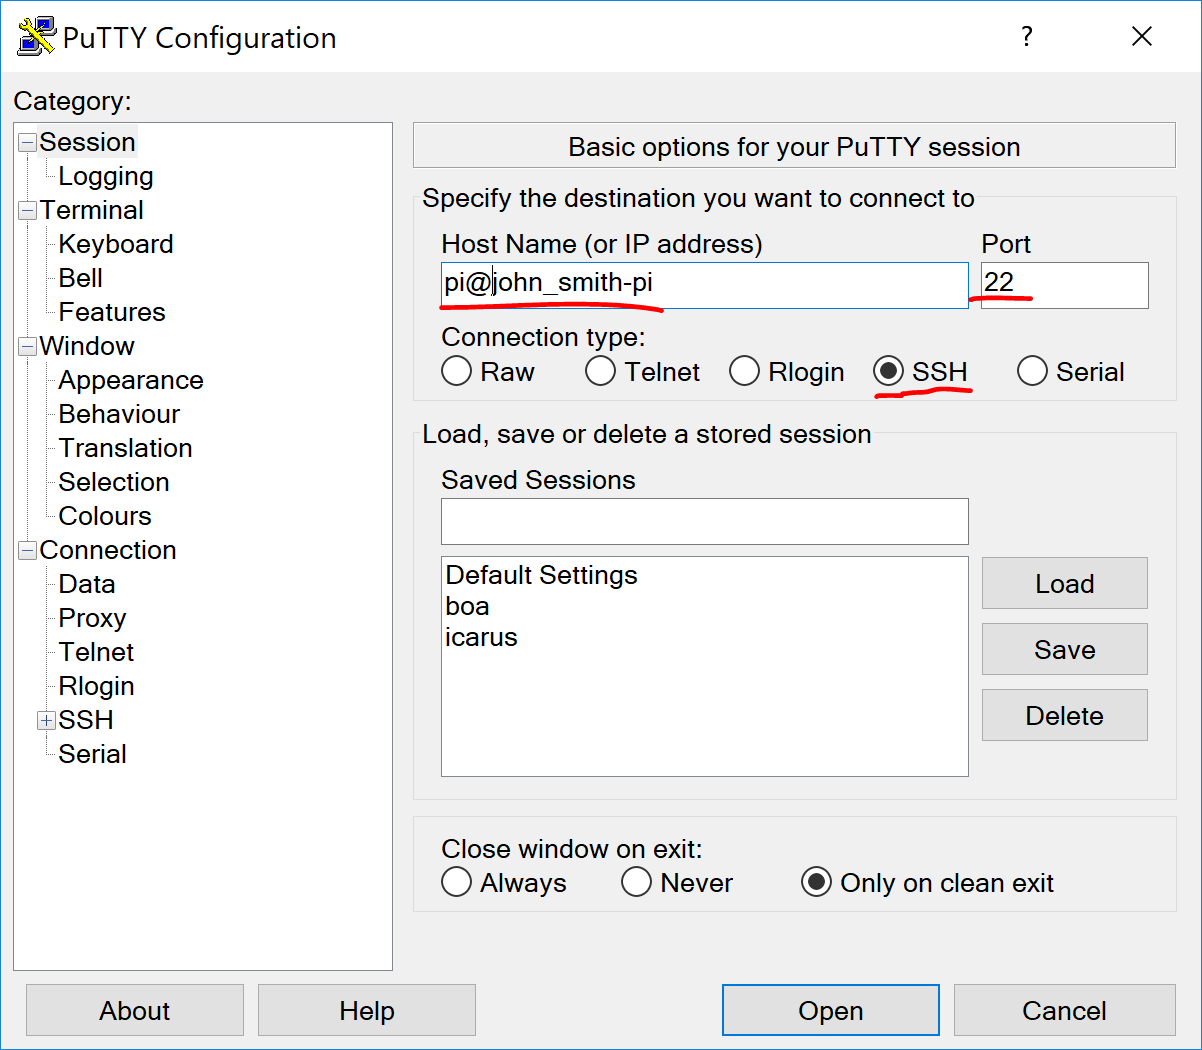
Click OK. Click yes to accept the host fingerprint and then enter your password. (Nothing shows up when you type your password. That is supposed to happen. Just type it in and push enter.)
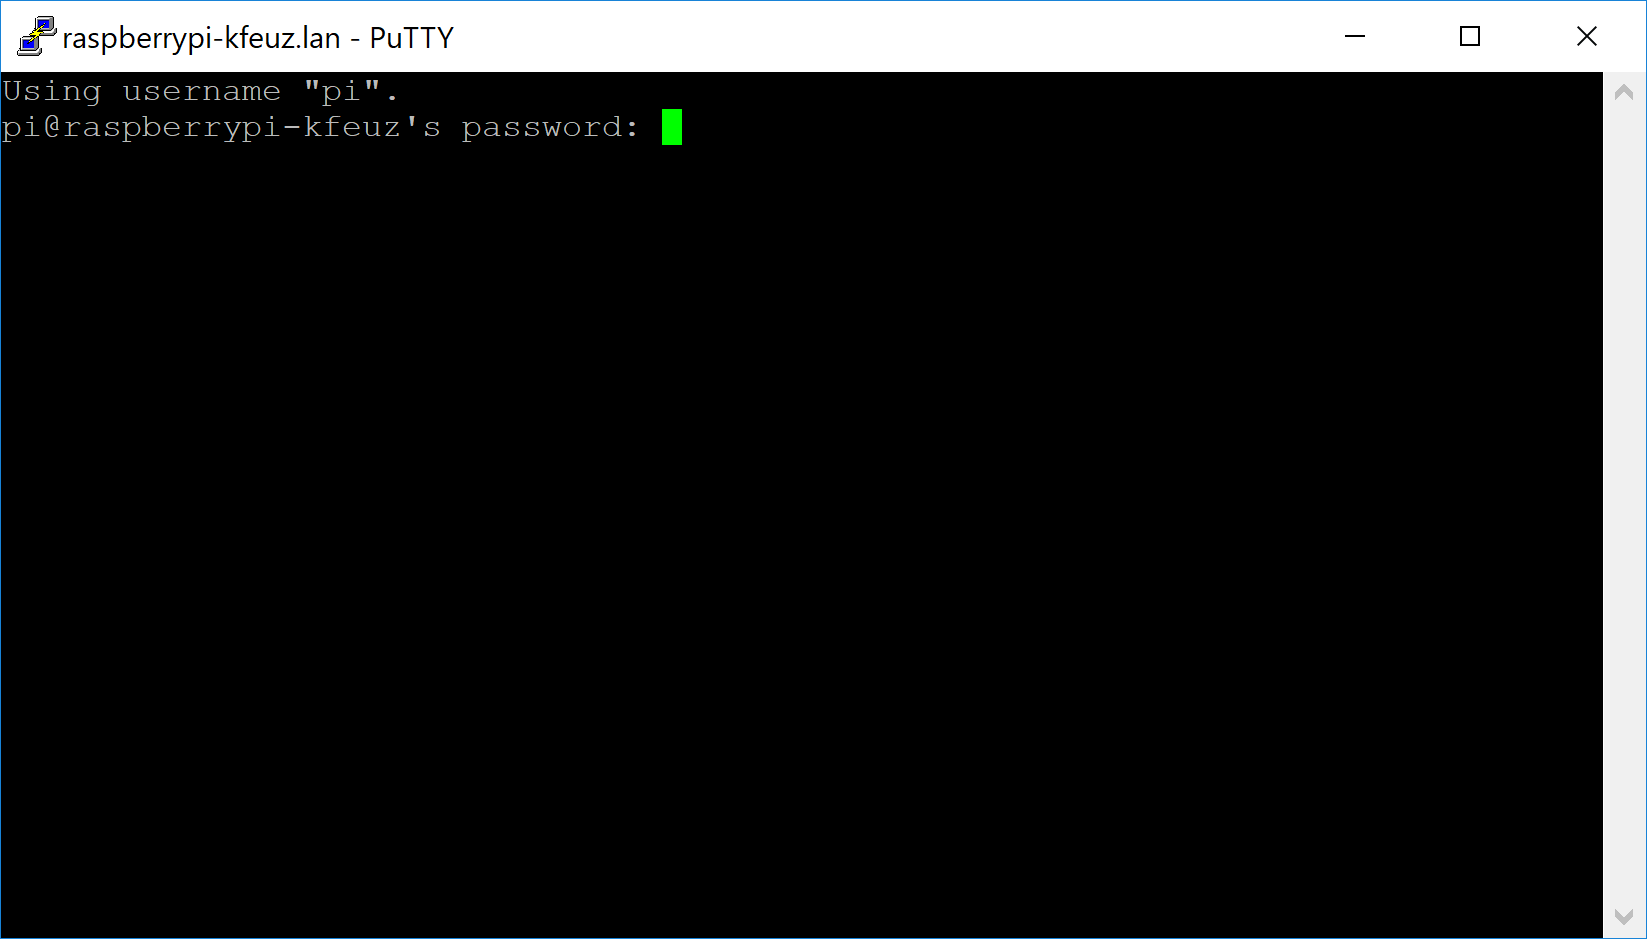
Once logged in you should see a screen like this
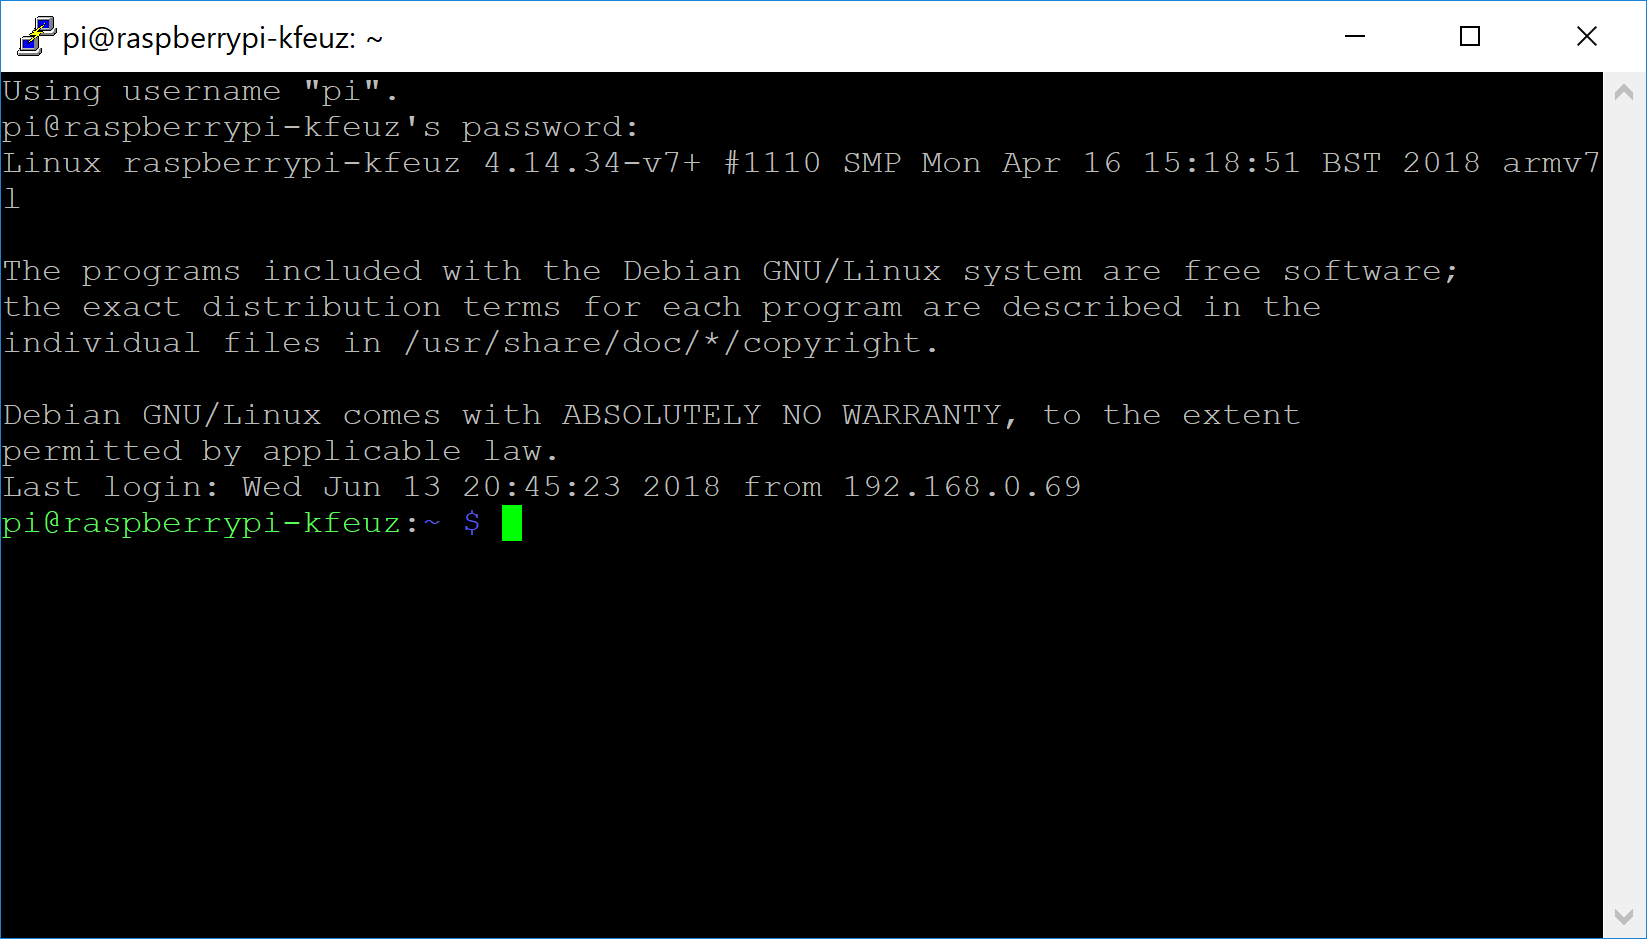
This is called the command-line, terminal, or shell.
You can type in commands and they will be run remotely on the pi
Some basic commands are:
For more help with the shell try these excellent tutorials:
VNC Viewer
The following instructions are for RealVNC Viewer which you can install on the desktop lab computer and or your phone or personal device.
Alternatively, you can connect using different vnc viewer software such as ultravnc, tightvnc, tigervnc, etc. if you follow the optional setup under remote access.
Back on the desktop lab computer, open the VNC Viewer program
Enter your hostname (i.e. john_smith-pi) and hit enter
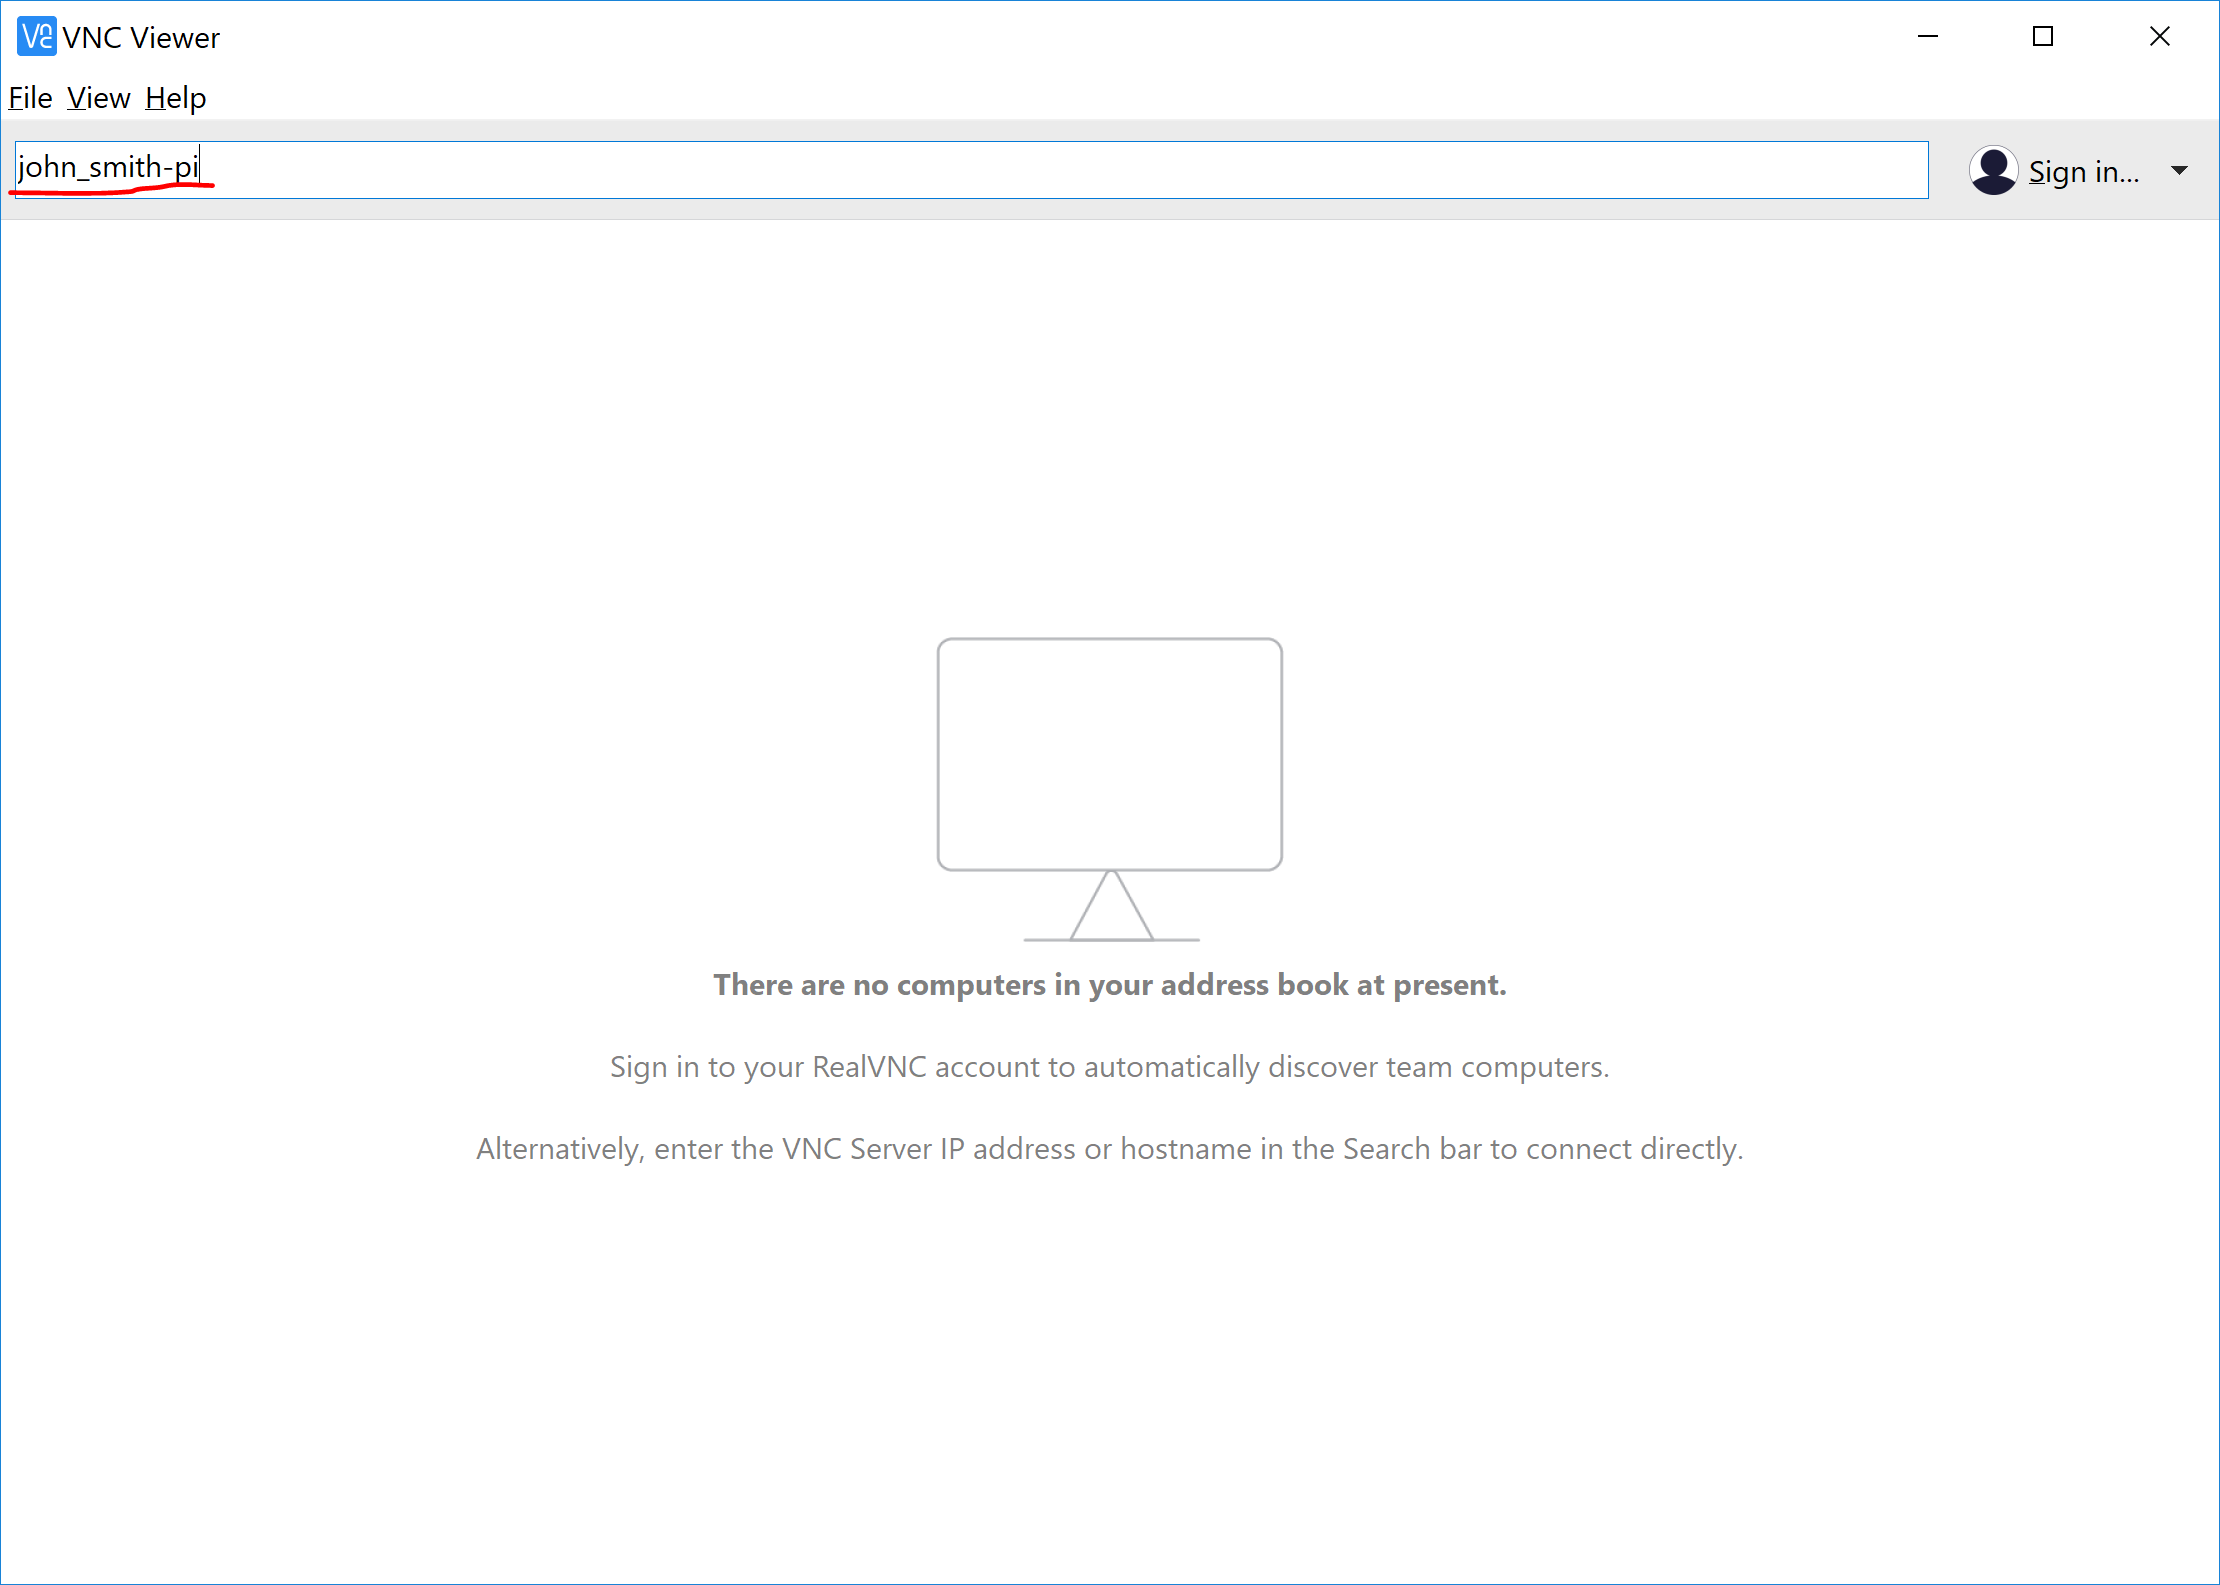
Enter your username (pi) and password
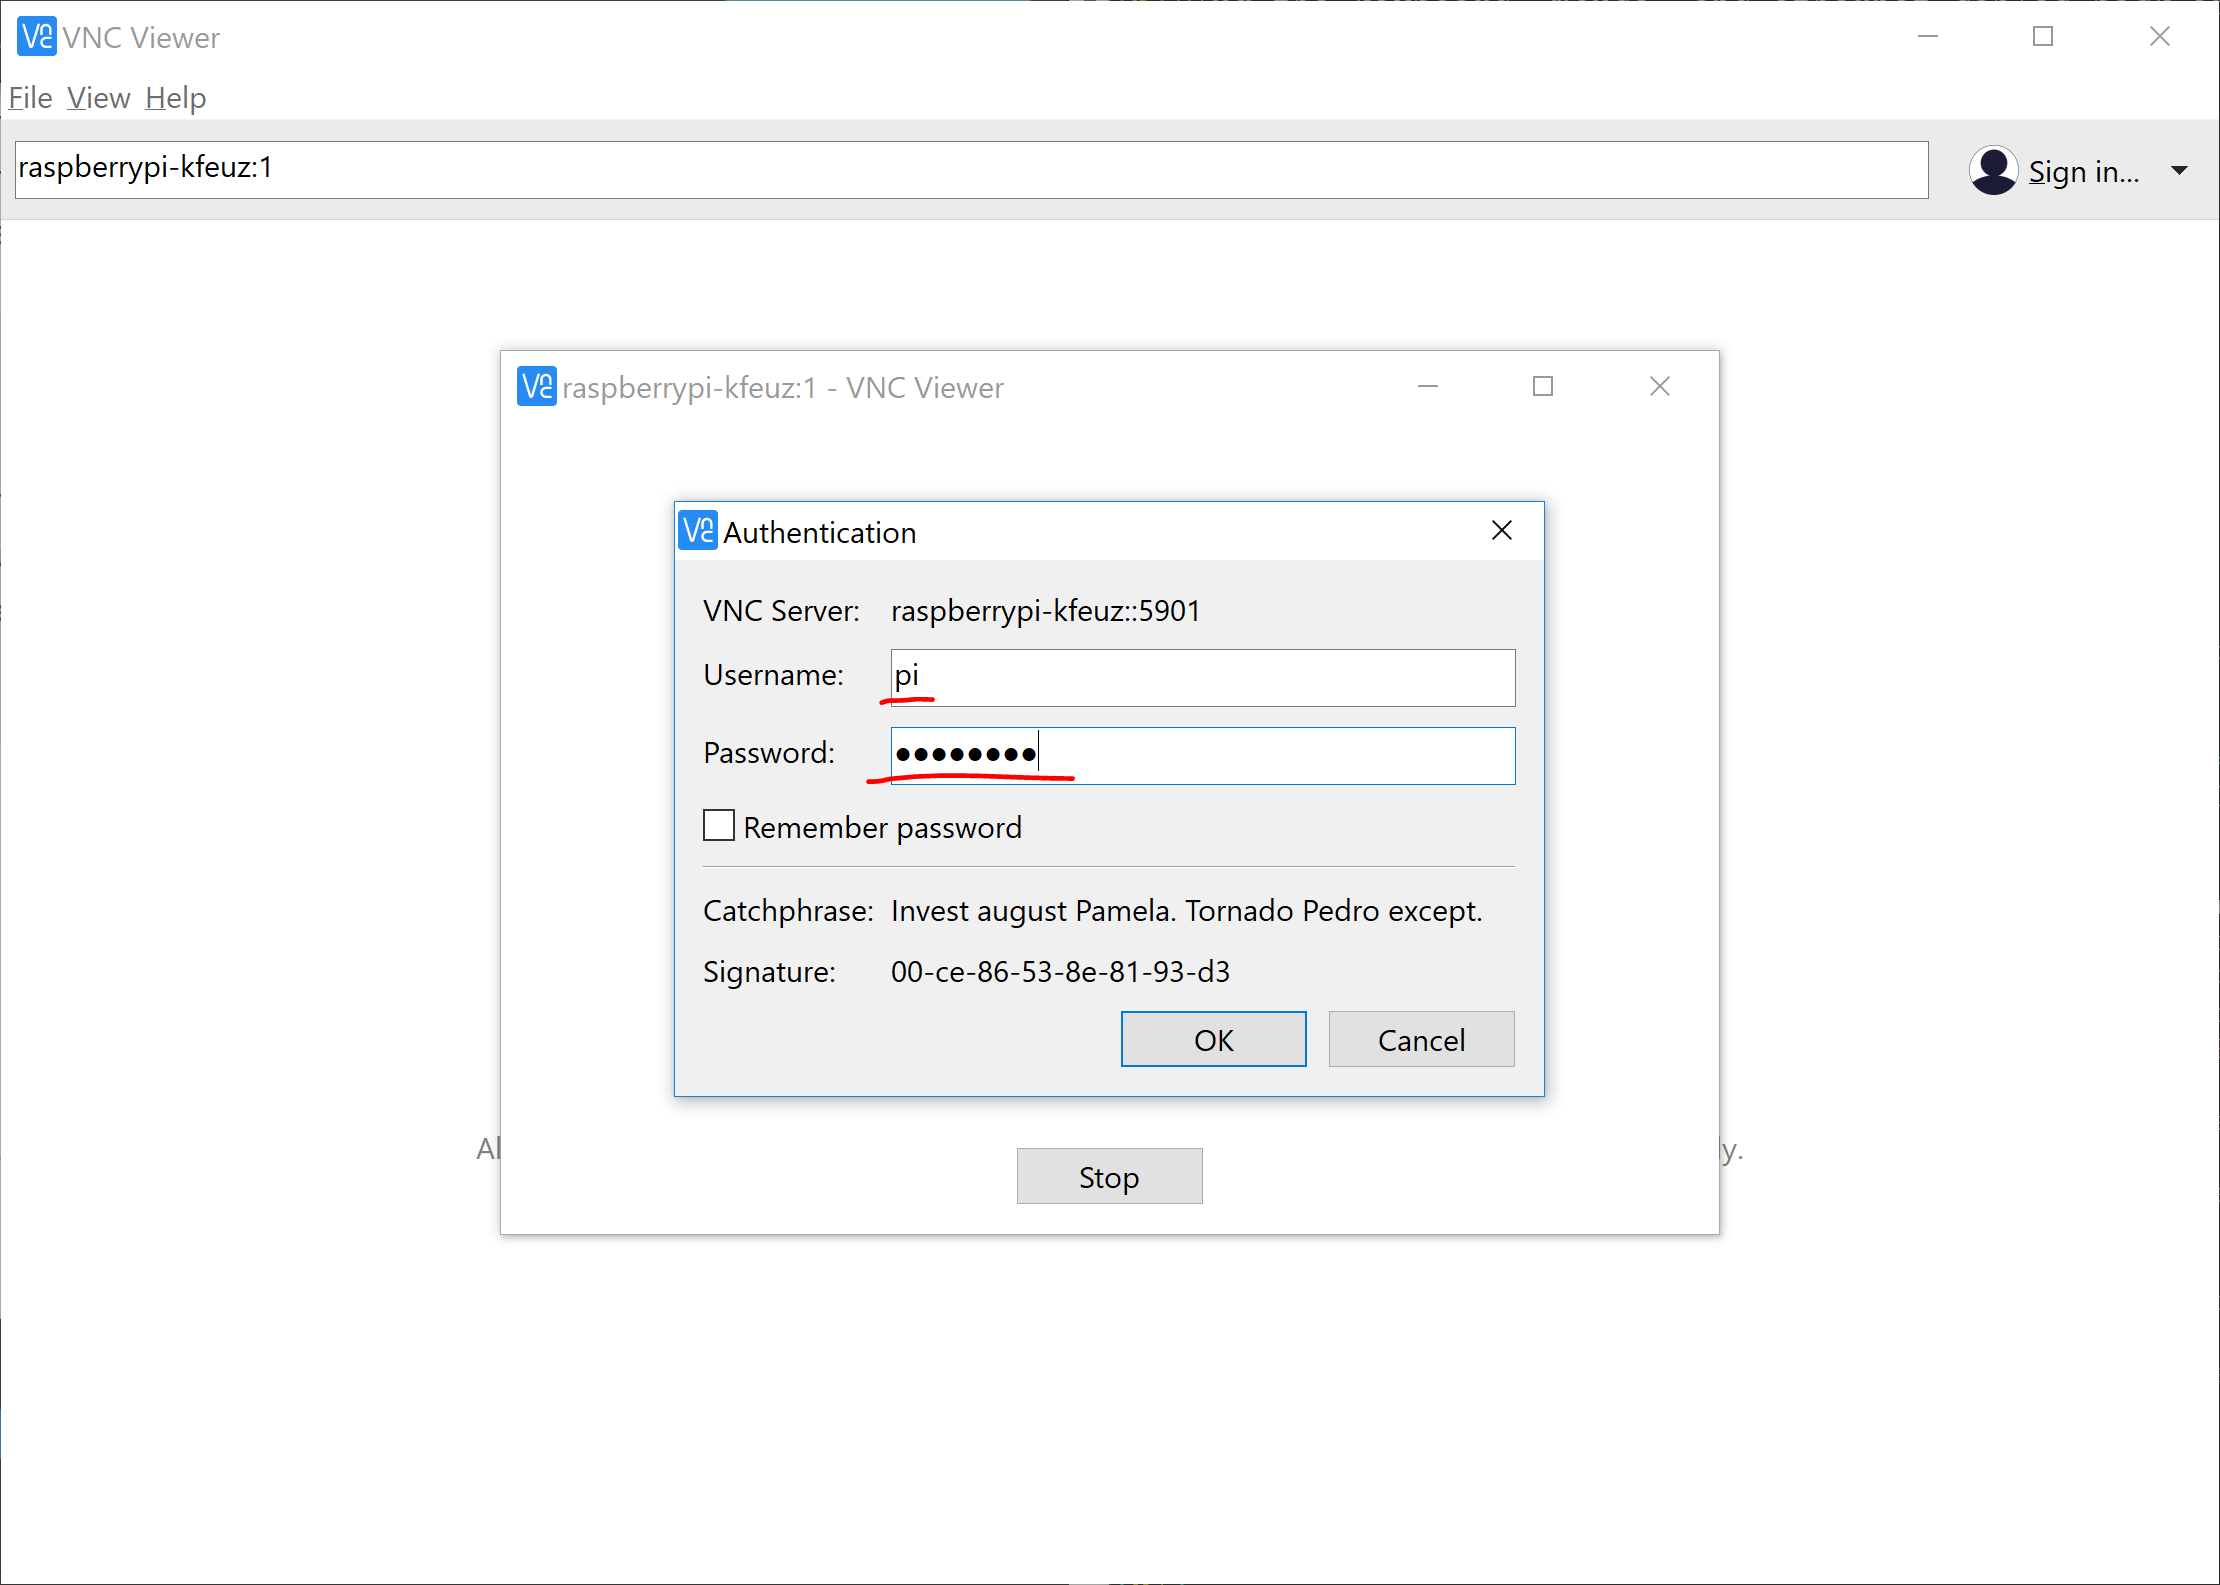
Click OK
You should now see a window showing the Raspberry Pi Desktop

Everything displayed here is running on your Raspberry Pi
Click the terminal icon to start a terminal (shell)
You can run commands from here just like in PuTTY
Help your neighbor and explore
Setting up a wireless access point
From a shell:
$ sudo apt install hostapd dnsmasq
This command does the following. sudo means run the command as root (or with administrative privileges). apt is the package manager which installs updates and removes software packages and applications. hostapd is the application for turning the Pi into a wireless access point. dnsmasq is the application that lets the Pi assign out IP addresses to the connecting clients.
Next we will stop the newly installed programs so that we can configure them
$ sudo systemctl stop hostapd$ sudo systemctl stop dnsmasq
dhcpcd
First we will configure dhcpcd to only use a static ip address on the wifi connection if it has not been given one automatically (i.e. if it is not connected to a wifi network). This will let us use the pi as either a wireless access point or as a normal wireless client to connect to other wireless access points such as your home router.
Use the terminal editor nano to edit the file /etc/dhcpcd.conf
$ sudo nano /etc/dhcpcd.conf
Add the following to the end of the file.
# define static profile
profile static_wlan0
static ip_address=192.168.18.1

# fallback to static profile on wlan0
interface wlan0
fallback static_wlan0
This tells the dhcpcd (the program responsible for getting an IP address) that if it cannot get an IP address for the wlan0 connection (i.e. the wifi connection) then it should use the IP address 192.168.18.1. You could put any IP address you want that follows the 192.168.x.y pattern where x is between 0 and 255. You want x to be different than what is used on your usual wifi network so probably avoid using 0,1 or 2. Also, it is convention for the router or access point (which will be our pi) to have address 1 for y. This makes it easy to remember what the IP address of the router is.
Use ctrl-o to save the file and ctrl-x to exit
DHCP server (dnsmasq)
Next we need to tell dnsmasq (our dhcp server program which will hand-out IP addresses to connecting clients) what range of IP addresses to use and on what interface to serve addresses.
First we will move the existing configuration file out of the way.
$ sudo mv /etc/dnsmasq.conf /etc/dnsmasq.conf.orig
Now we can create our own configuration file
$ sudo nano /etc/dnsmasq.conf
Add the following
#Only apply to the wlan0 interface
interface=wlan0
  #Use a short lifespan to recover addresses quicker.
  #Will only act as a DHCP server if it is on the 192.168.18.0 network
  dhcp-range=192.168.18.10,192.168.18.200,255.255.255.0,6h
This tells dnsmasq to use IP addresses between 192.168.18.10 and 192.168.18.200. If you used a different x value in your dhcpcd.conf file you should use that same value here. the 6h on the end tells dnsmasq that the address will be valid for 6 hours at which point the client will need to renew the address to stay connected. We save a few IP addresses at the beginning and the end in case we need them for special devices. Again this is a common convention that makes working with networks easier.
Use ctrl-o to save the file and ctrl-x to exit
hostapd
Finally, we need to set up the hostapd. This is the software that actually turns our pi into a wireless access point.
We need to create a file called /etc/hostapd/hostapd.conf
$ sudo nano /etc/hostapd/hostapd.conf
Add the following to that file
interface=wlan0
driver=nl80211
ssid=feuz-library
hw_mode=g
channel=7
wmm_enabled=0
macaddr_acl=0
ignore_broadcast_ssid=0
Use ctrl-o to save the file and ctrl-x to exit
We also need to tell hostapd to use this configuration file. To do that open the file /etc/default/hostapd.
$ sudo nano /etc/default/hostapd
Find the line that says
#DAEMON_CONF=and change it to
DAEMON_CONF="/etc/hostapd/hostapd.conf"
Use ctrl-o to save the file and ctrl-x to exit
We can now restart the pi.
$ sudo systemctl reboot
On a wireless device (like your phone) go to the wireless networks and connect to your newly created access point.
Installing the Apache Web Server
Install the apache web server using the following command:
$ sudo apt install apache2
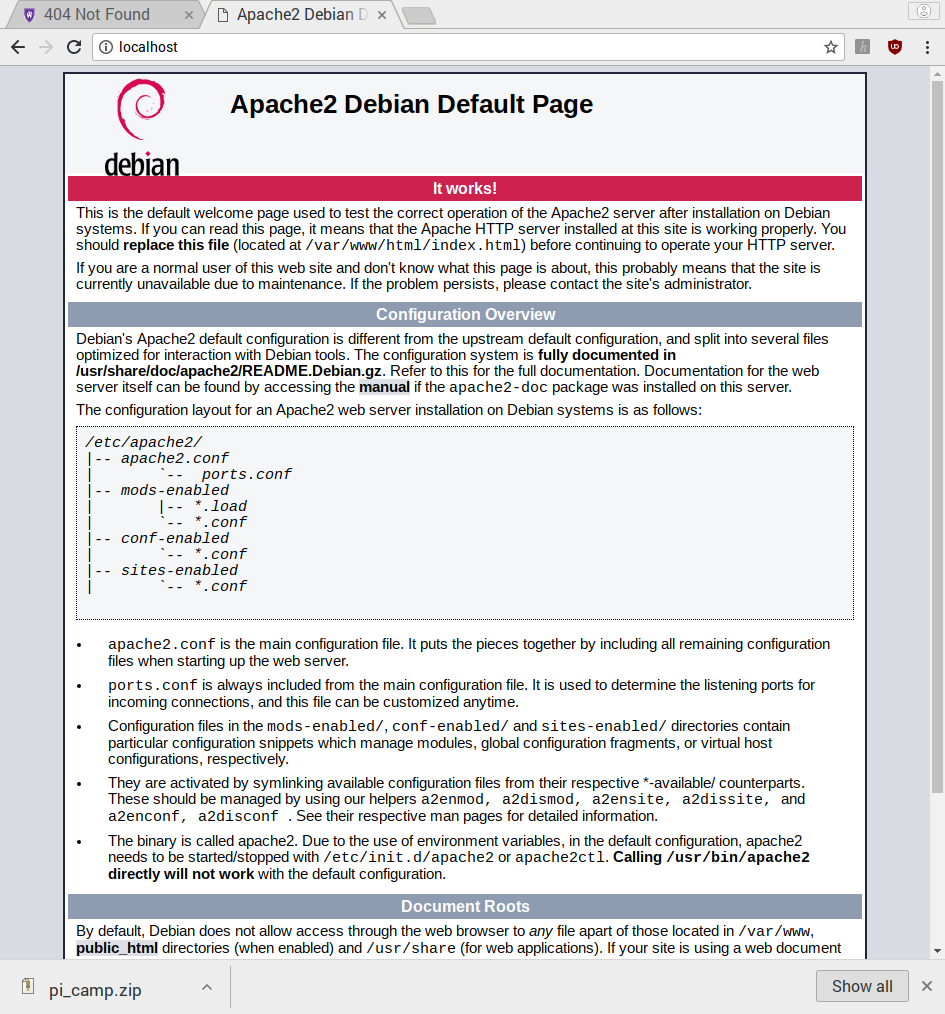
Open a web browser on the pi and go to localhost. You should see an apache configuration page like this:
Open a web browser on the wireless device connected to the pi and go to hostname.local. You should see the same apache configuration page. If it does not show up try going to 192.168.18.1. If it still does not show up make sure you are connected to the raspberry pi wireless access point you created.
Creating the digital library
First we want to make it easy to edit the webpages. (So we don't need admin or root privileges.
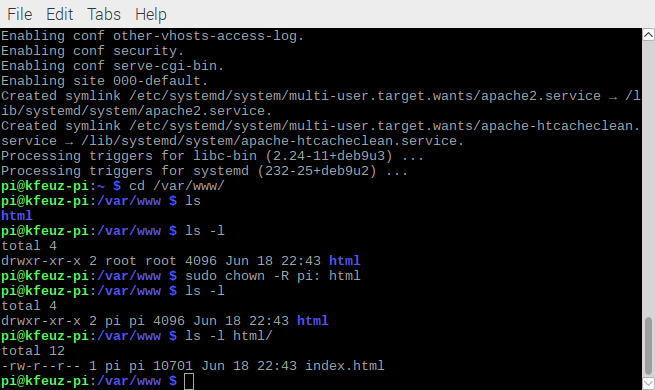
Navigate to the /var/www directory in a shell
$ cd /var/www/
There should be one folder called html there
$ ls
The html folder is owned by root as are the files inside it. This means you need to be the root user to make changes to it.
$ ls -l
Change the owner to pi for the html folder and all it's files and folders
$ sudo chown -R pi: html
The chown is the command to change ownership of files and folders. The -R in the above command means recursive (i.e. change all the subfolders and files too). The pi: means change the owner and group to pi. html is the folder to change.
Verfiy it worked
$ ls -l
Download the sample library from http://icarus.cs.weber.edu/~kfeuz/downloads/pi_camp.zip.
Extract the files to the /var/www/html folder
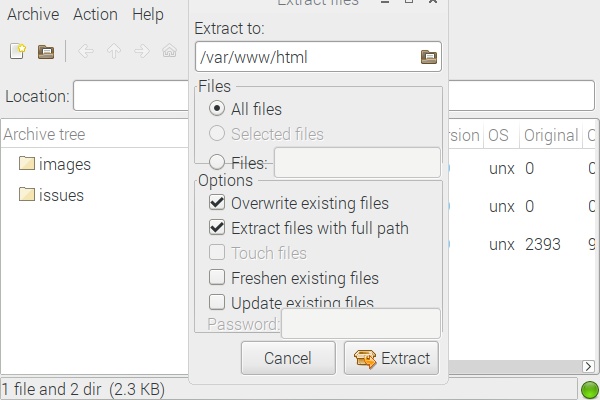
Verify it worked

Find additional free files for your library. Make sure they are freely licensed, not pirated. Make sure they are appropriate. (Something your could show your parents and grandparents). Look for books in the public domain (check out project gutenberg) or Creative Commons Licensed.
Save a copy of the pdf into the issues /var/www/html/issues folder
Save an image to use as the cover in the images folder
Edit the /var/www/html/index.html file by adding the following code somewhere after the line
<div class="responsive" >
and before the lines
</div>
</body>
</html>
Code to add:
<div class="responsive">
  <div class="img">
    <a target="_top" href="issues/YOUR_FILENAME_HERE.pdf">
      <img src="images/YOUR_IMAGE_NAME_HERE.jpg" >
    </a>
  </div>
  <div class="desc"><p>Your description here.</p>
    <p>More descrption here. Can include license link like this <a href="licence url" target="_blank">License display text</a></p>
  </div>
</div>
Other Resources
More Raspberry Pi Tutorials:
HTML and CSS Tutorials:
Cool software for the Pi: